Wednesday, March 30, 2011
Ventilation
Last night in class we learned all about ventilation. Ventilation is used to release heat, smoke and fire build up in a room. If used properly, this can aid in search and rescue efforts and it can help crews to put out the fire quicker. Last night was a lecture class. We learned about all different types of ventilation. We learned about horizontal and vertical ventilation, hydraulic, and positive and negative pressure. The biggest things to remember with ventilation is to look for signs of potential flashover and backdrafts. If you see signs of backdraft, which include blackened windows, smoke puffs coming from the building or smoke being sucked back into the building, or smoke seeping from cracks, you need to be especially careful. If you break a window and feed the room oxygen it will cause and explosion and ignite the room. It is also important to know where you are going to ventilate. Depending on where the fire is, you will begin ventilation efforts. Every time of ventilation has a different use. Hydraulic ventilation for instance is when you use a hose line and open the nozzle to a fog stream. If you stand about two feet from a window and open the house line the water will push all of the heat, smoke and gases out of the room. It creates a sort of vacuum and will push all the contents out. The downside with this though is it uses up water, it could cause a ice hazard if it is below freezing outside, it will cause water damage to the property and it keeps firefighters in the building to preform the task. Although it does have negative effects it has proved to be very effective in ventilation. Positive and negative pressure involve fans. With negative pressure you place a fan in a doorway or window facing outside and when you turn it on it pulls all the smoke and gases out of the room. Positive pressure is placing a fan outside of the building facing the door and blowing air into the building making sure the air reaches all of the door frame. This is known as a cone of air. This will push all of the smoke and gases out from where the fire is located. If used too soon it could spread the fire so you need to be mindful of this. Another important type of ventilation is roof ventilation. This falls under verticle ventilation. You will be cutting a square in the roof above the fire to help release the smoke and gases built up inside of the room. You can use power tools or axes to accomplish this depending on what material the roof is made of. You want to always work in teams and always have a least two ways to get off of the roof in case of an emergency. Thursday night in class we will be doing hands on ventilation with a mock roof. Now that we have the lecture part under our belts, we will get to used what we learned on the fire ground at school! It is supposed to rain/snow Thursday night so it should be fun!
Monday, March 28, 2011
Ground Ladders and Ariel Operations Cont.
Yesterday was a very long but educational day at fire school. We had school from 8-4 yesterday and it was freezing all day! Even with all of my gear on I was still cold. We started out the day doing minute drills. Minutes drills are when you put on all of your fire gear in under 1 minute. This includes boots and pants, jacket, helmet, gloves and hood. Then once we have all of our gear on we have to don our SCBA in under one minute and be breathing air by the time we are doing putting everything on. Once we had all of our gear on we went right to work with ladders. We started the day learning the different parts of the ladders and how to properly lift and carry them with your partner. The biggest thing with carrying ladders is making sure your partner understands your commands and that the area around you is clear of people and any overhead obstructions. Once we had this part down then we learned how to throw ladders to the building. We did this by ourselves with smaller ladders and then we did this again in groups with extension ladders. Once we had ladders up against the building then we learned how to do a leg lock. A leg lock is a technique used for ventilation. You basically wrap your leg around the rungs of the ladder and this helps you to reach to the side of the ladder and remain in control so you can break a window if needed. we did this a lot yesterday. We practiced leg locks on all different ladders and at different heights. After leg locks we practiced climbing the ladder with a tool. This is a little more challenging because you have extra weight on your one side and you dont have as good a grip on the ladder when climbing. Once the first four hours of class was over we took a break. After our break we got a chance to climb ariel ladders. Ariel ladders are the ones you see on a fire truck. We climbed up a ladder extended to 55 feet, climbed through a window, walked to the other side of the building, then climbed out a window and down a ladder extended 50 feet. If you are scared of heights than this would have been a challenge for you. We practiced throwing more ladders after this and climbed more ladders with our SCBA on which added extra weight to our bodies and makes it a little harder to climb the ladder. Once we did that then we did a little hands on with rescuing victims using ladders. I got to play the unconscious victim. We practiced bringing down conscious victims with our classmates. The biggest thing to remember with this is to keep the victim calm and how to restrain them if the begin to act out. This helps you keep them and yourself safe. It was a long and tiring day yesterday and my legs and arms are very sore today from all the climbing we did. This is a very important part of firefighting and we need to learn it. Without it, we can't save lives and homes.
 This is what a leg lock looks like
 This is me playing the unconscious victim with my instructor
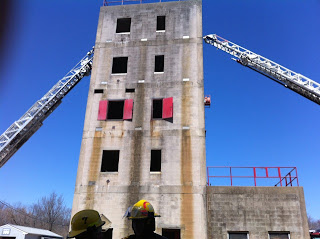 A picture of the ariel ladders we climbed.


Friday, March 25, 2011
Ground Ladders and Ariels Operations
3/24/11- Last night in class we learned about using ladders in firefighting. There are actually all different types of ladders and each one has a different use. There are 3 main materials most ladder are made out of. They are Metal, Wood and Fiberglass. Believe it or not many fire companies still use wooden ladders. Our company mostly uses metal. We have to learn all the different types of ladders (single, roof, folding, extension, combination, and pompier), parts of the ladder, how to inspect the ladders for damage, how to clean the ladders after use, which ladders are best used for each job and how to carry ladders on the fire ground. It is important to inspect the ladders after use to make sure they are still in a good working condition. If not then they need to be serviced. We didn't get a chance to do any hands on with ladders last night. Sunday we will be at school from 8-4pm and we are going to do all kinds of training exercises with ladders. We are going to learn how to carry and lift ladders, how to place them depending on how we need to use them and I will even get to carry someone down a ladder in case of an emergency. The best part of the class is going to be climbing the ariel ladder. An ariel ladder is the kind you see driving down the road to a fire call. They can extend all the way to the roof of a building so firefighters can gain access to the roof. We are going to be climbing a 100 foot ariel ladder. Sunday should be a lot of fun but I know it is going to be tiring. We don't climb ladders in street clothes. We climb ladders with all of our gear which adds an extra 30 pounds to our bodies. Plus it restricts our movement. Its going to be interesting to say the very least. I cant wait to write about it!
Here are some pictures of different types of ladders and their different parts.


Here are some pictures of different types of ladders and their different parts.
Subscribe to:
Posts (Atom)